
I thought some of you might be interested in how I go about recording & what my setup looks like. See below where you can download “Itty Bitty Ditty” from Strings & Things for Garageband. Also there is an instructional video of how to play “Itty Bitty Ditty”.
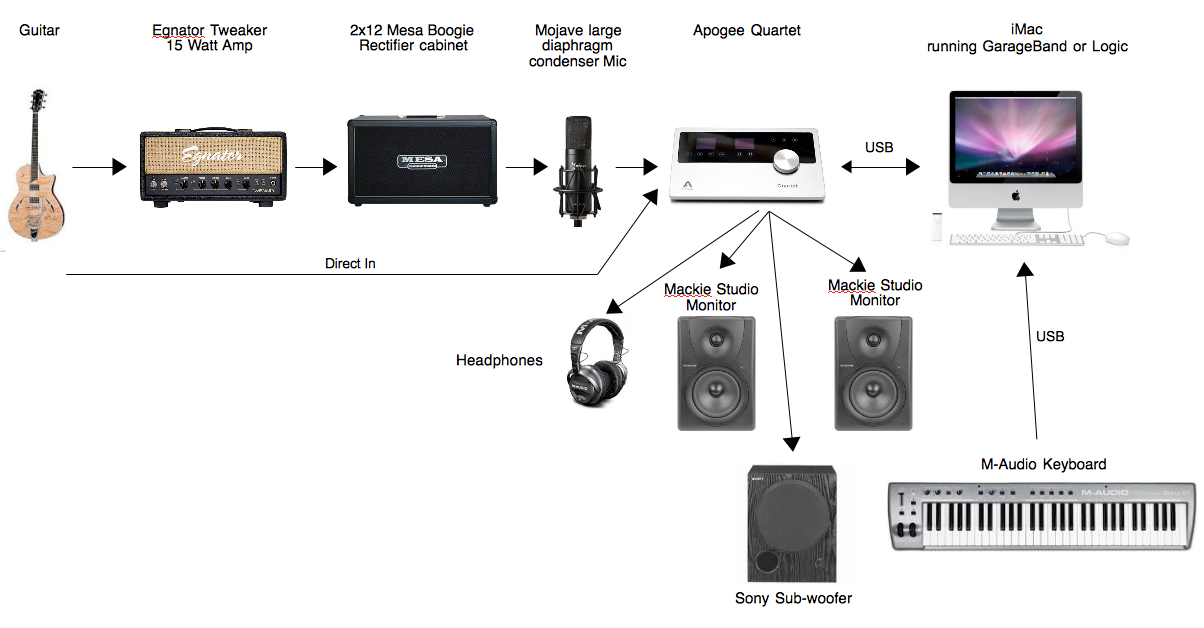
The basic setup I use almost every time looks like this:
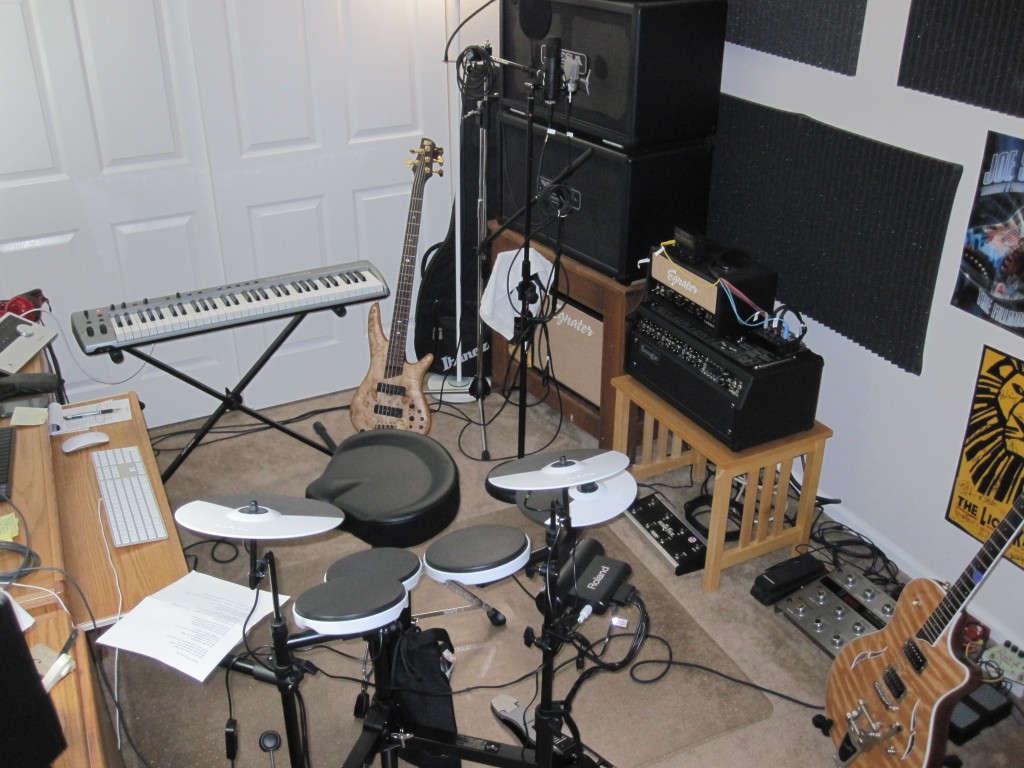
When I have all the gear “busted out” – guitar, bass, drums, keyboard:
Garageband and Logic (& I imagine ProTools does as well) have many very cool guitar effects and so sometimes I’ll run the guitar straight into the computer, via the audio interface (Direct In above). But most of the time I want the tone of the Amp and Cabinet combination. Sometimes I’ll insert a Joe Satriani “Saturator” distortion pedal (not show) in-between the Guitar and the Amp.
Note: Recording guitars in a studio environment happens at very low sound levels, which means very low wattages – don’t crank your Amp to eleven & expect to make killer recordings. I absolutely love this little 15 watt Egnator Tweaker Amp (I call it “Little Eggy”). I can get all kinds of the good pre-amp distortion guitar players seek at very comfortable listening levels and consequently excellent recording levels.
There are two key elements you have to pay attention to in order to make decent recordings at home:
- The Audio Interface you use (Quartet shown above) has to have high-quality preamps and A/D converters. There are many choices for audio interfaces. I started with cheaper ones and have kind of worked my way up to this one. Bottom line: buy an audio interface that has specs (specifically: signal to noise ratio and total harmonic distortion) as good or better than an M-Audio Fast Track Pro or you will forever be fighting with hiss & noise in your recordings. Do not try to skimp here, been there, tried that – no go.
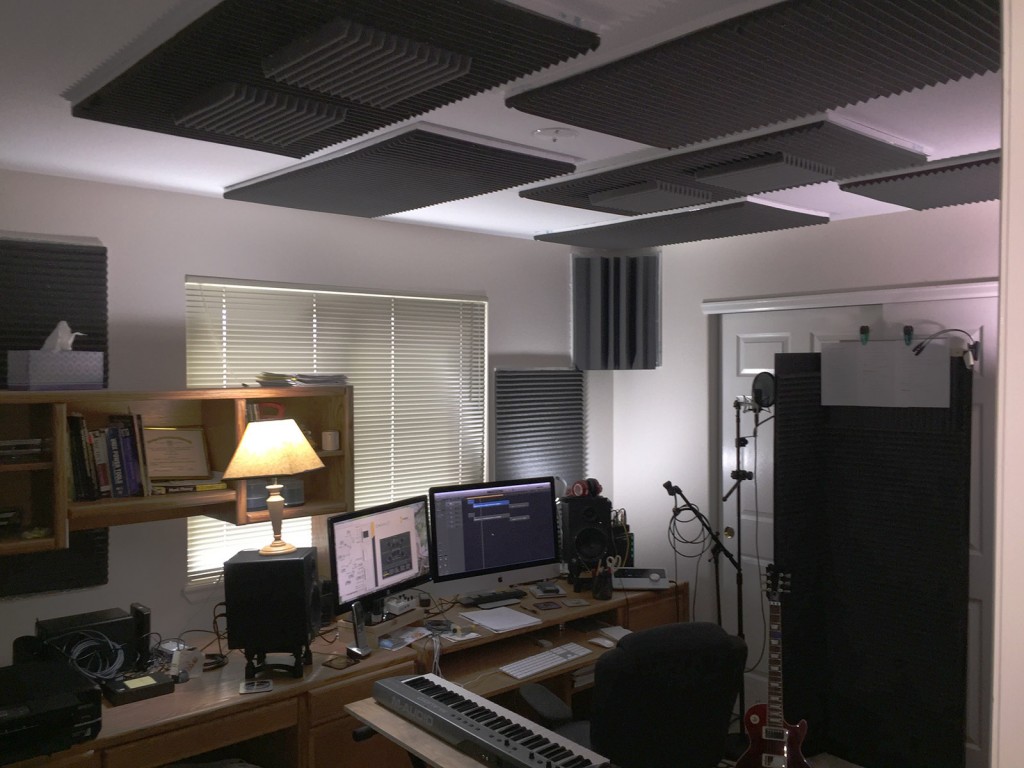
- The room. I record in a bedroom in my house. The floor is carpeted and the walls and ceiling are sheetrock. If you attempt to make recordings in this environment, the result will be very bright and with a nasty reverb effect you will not like or be able to remove while mixing – it’ll sound like a cheap home recording. There’s a company in Grand Rapids, MI (Pro Sound Foam) that sells acoustic dampening foam. I have “treated” the ceiling and walls with this acoustic foam, as well as installing bass traps in the corners. This creates a very “dead” space and resulting very “flat” recordings, which is what you want (Pros: yes, I know there are a thousand & one philosophies on this – trying to keep this simple for the beginner). Now you are free to add however much reverb and other effects while mixing – and you will be all smiles. Here’s a picture of my current room treatment.
The following are two sound clips from this room. The first is the bare room with no treatment, the second is the treated room. These are two identical recordings I made, same setup, position, microphones, guitar etc. The recording is of 4 hand claps followed by some guitar strumming. You can hear the huge difference on the hand claps.
Untreated room:
Treated room:
Another excellent source of information is homerecording.com.
When I’m recording live instruments (guitars with amps, djembes, wood blocks etc.) I have the sound output of the computer routed to the headphones, because you want the microphone to only pick up the instrument you’re playing. You can set up your system such that you can hear in the headphones the instrument you are recording plus all (or any) of the other tracks.
For guitar direct in or keyboards, I have the sound output of the computer routed to the studio monitors & sub-woofer – there’s no microphone in this case.
I use sampled drum loops from Beta Monkey. These are high quality samples. Each package comes with a bunch of loops (they recorded a real drummer playing some sequence of drum hits) and individual drum hits – they are $30 US – what a deal. Depending on the song, I can go from
- Using all individual drum hits
- To a combination of individual drum hits + loops
- To using all loops
Just depends on the song & how I feel & how much time I have or want to spend.
The following picture shows the beginning of “Born Under a Bad Sign”

This was done using Logic but you can do the exact same thing with Garageband. This is one of those “combo” songs. I put all of the primary drum loops on one track, fills on a second track & then added separate tracks for a kick (bass) drum, snare, hi-hat etc. Using the individual drum hit approach, you can actually create drum parts that would be impossible for a single drummer to perform. You can argue that doing this is simply “wrong” – but hey, you’re the artist, express in whatever way you want.
The approach I use to song construction while recording is this:
- Put down the drums, or enough of a basic drum track to capture the rhythm of each section (verse, chorus, bridges etc.) of the tune.
- Add the bass or enough of that.
- Then add the guitars and the vocals.
- Lastly, tweak & arrange all the parts until you’re happy.
Why? An excellent recording needs to be what musicians refer to as “tight”. And to get tight, the tempo has got to be there. This is why I recommend you start with drums. Percussion forms the backbone and is the heartbeat of a song. I do the bass second because I have found that the bass guitar needs to be tight with the kick drum. Once you have that, now you have a structure with excellent tempo & tightness and this provides a fantastic playground on which to add all of the other elements.
I may be stating the obvious here, but everything from the guitar player’s fingers, the strings, the pick, the pickups, the amp, the cabinet, the microphone, the recording room, the mix, the mastering, the format delivered to the listener (CD, MP3, AAC) and their environment (car, home stereo, iPod etc.), everything – has an influence on how the listener perceives a work. When I’m mixing & listening to test mixes, I listen in my car, my home theater surround system, my iPod with ear buds and Bose Noise Canceling headphones. I can tell you this: It is very difficult to create a single mix that sounds good in all of these venues. You end up having to make compromises and find that “balance” that’s good enough for all. And that my friends, is the fine art of recording – and only time and experience can help you there.
Download “Itty Bitty Ditty” for Garageband.
Instructional video: How to play “Itty Bitty Ditty”, the rhythm guitar part:
Guitar Amp Noise
Here is information on dealing with Guitar Amplifier Noise when recording.
Just replaced my M-Audio Fast Track Pro with an Apogee Quartet (http://www.apogeedigital.com/products/quartet.php). The pre-amps and A-to-D converters are of much higher quality than in the M-Audio unit. Got it all set up yesterday & I have to say it is a sweet little unit.
Some interesting stuff here: http://record.apogeedigital.com
Any vintage microphones you recommend?
Sorry no. Besides the Mojave, I have a Beyer Dynamic M160, use a couple SM58’s for vocals. I’m afraid you’re probably 10 light years ahead me here.
Added a rather lengthy page on techniques for dealing with amplifier noise in high-gain guitar amplifier settings. I discuss noise reduction software and a technique known as “phase cancellation” .
Updated information on treating the room, added a picture of the current treatment, added recordings of “untreated” and “treated” so you can hear the difference.